ARRI Ensō lenses
The same way the Arri Signature lenses (2018) were the evolution of the Master Primes (2005). The Arri Enos lenses (2024) are the evolution of the Ultra Primes (1999).
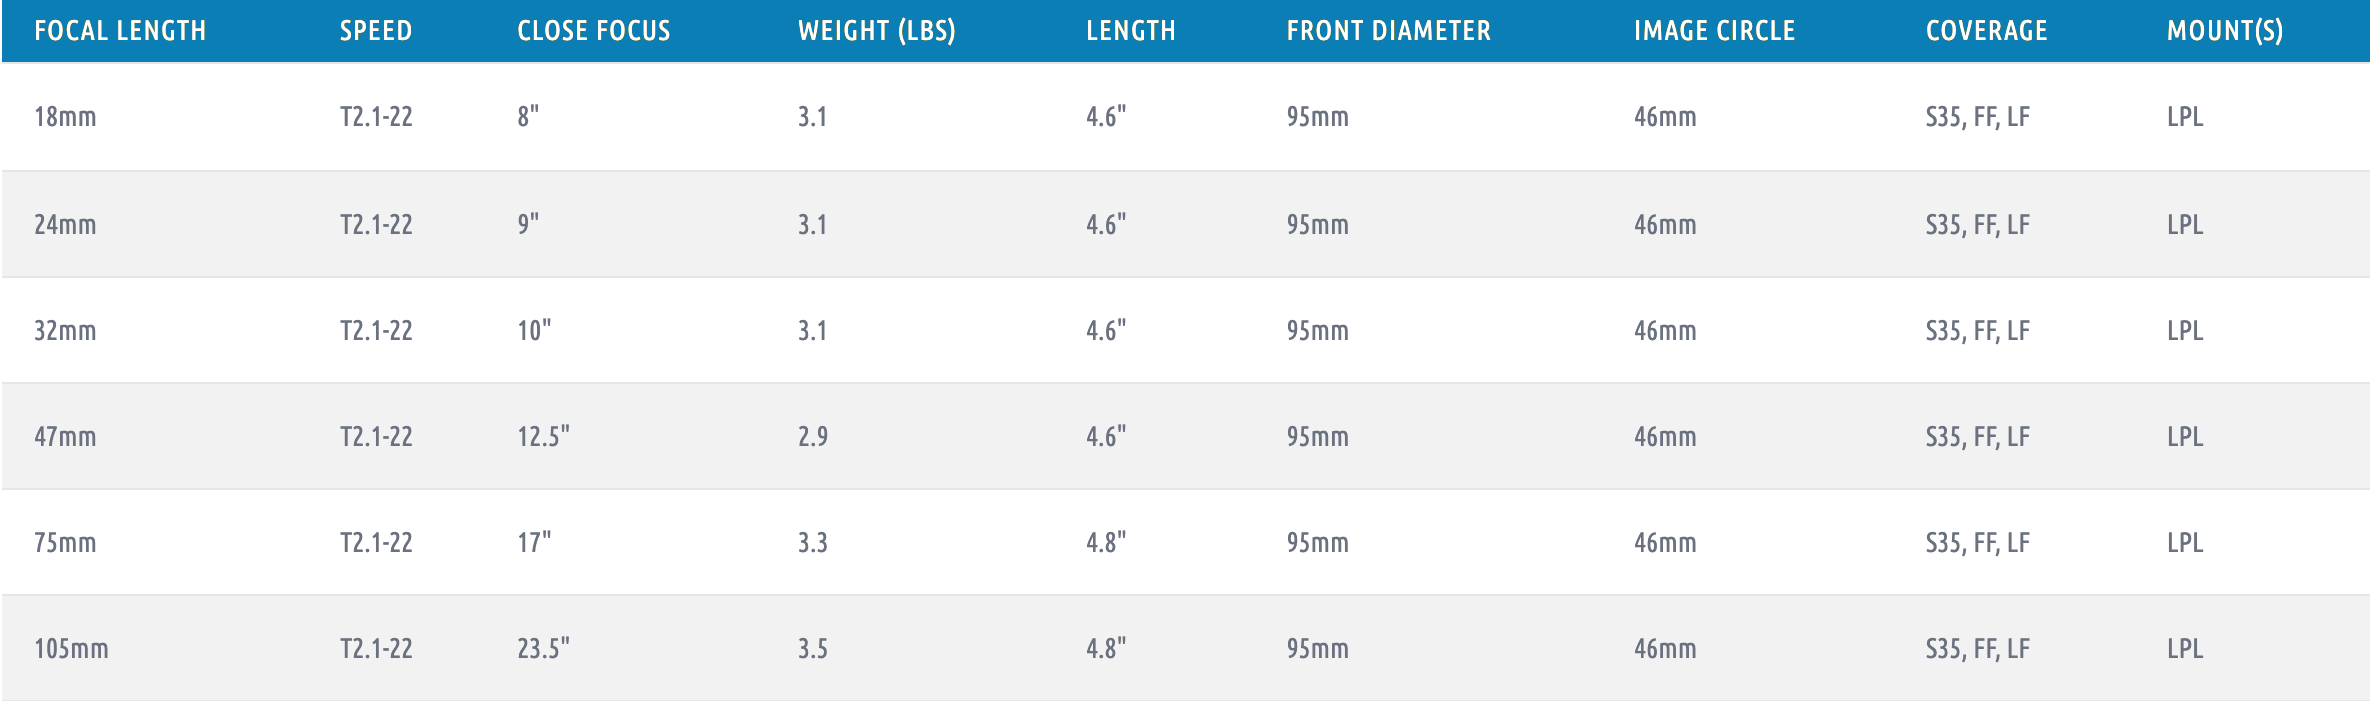
Ensō match Signatures in color, contrast and concept but flare and ghost ever so slightly more giving you the ability to use Ensō and Signature lenses interchangeably. The core set of 6 lenses come as an 18mm, 24mm, 32mm, 47mm, 75mm and 105mm with consistent 95mm fronts, LPL mounts, 1:4 magnification ratio, and all start at a T2.1. They are designed to be sharp in the center with a vintage-style detuning at the edges. The lenses also allow for customization through interchangeable rear elements, enabling users to achieve different looks by externally tuning the lens.
Below are some personal thoughts about the lenses as well as some technical data. I’d like to credit the ARRI Tech Talk videos on YouTube as well as NewShooter and the FDTimes which are all linked below.
KEY TAKEAWAYS
Large Format/Full Frame
LPL Mount
1:4 Magnification Ratio
95mm Fronts
Start at T2.1* w/ Liner Iris Scale
Uniform Lens Housings (lens rings are in the same position)
Magnetic Rear Elements for External Tuning w/ LDS-2 & /i
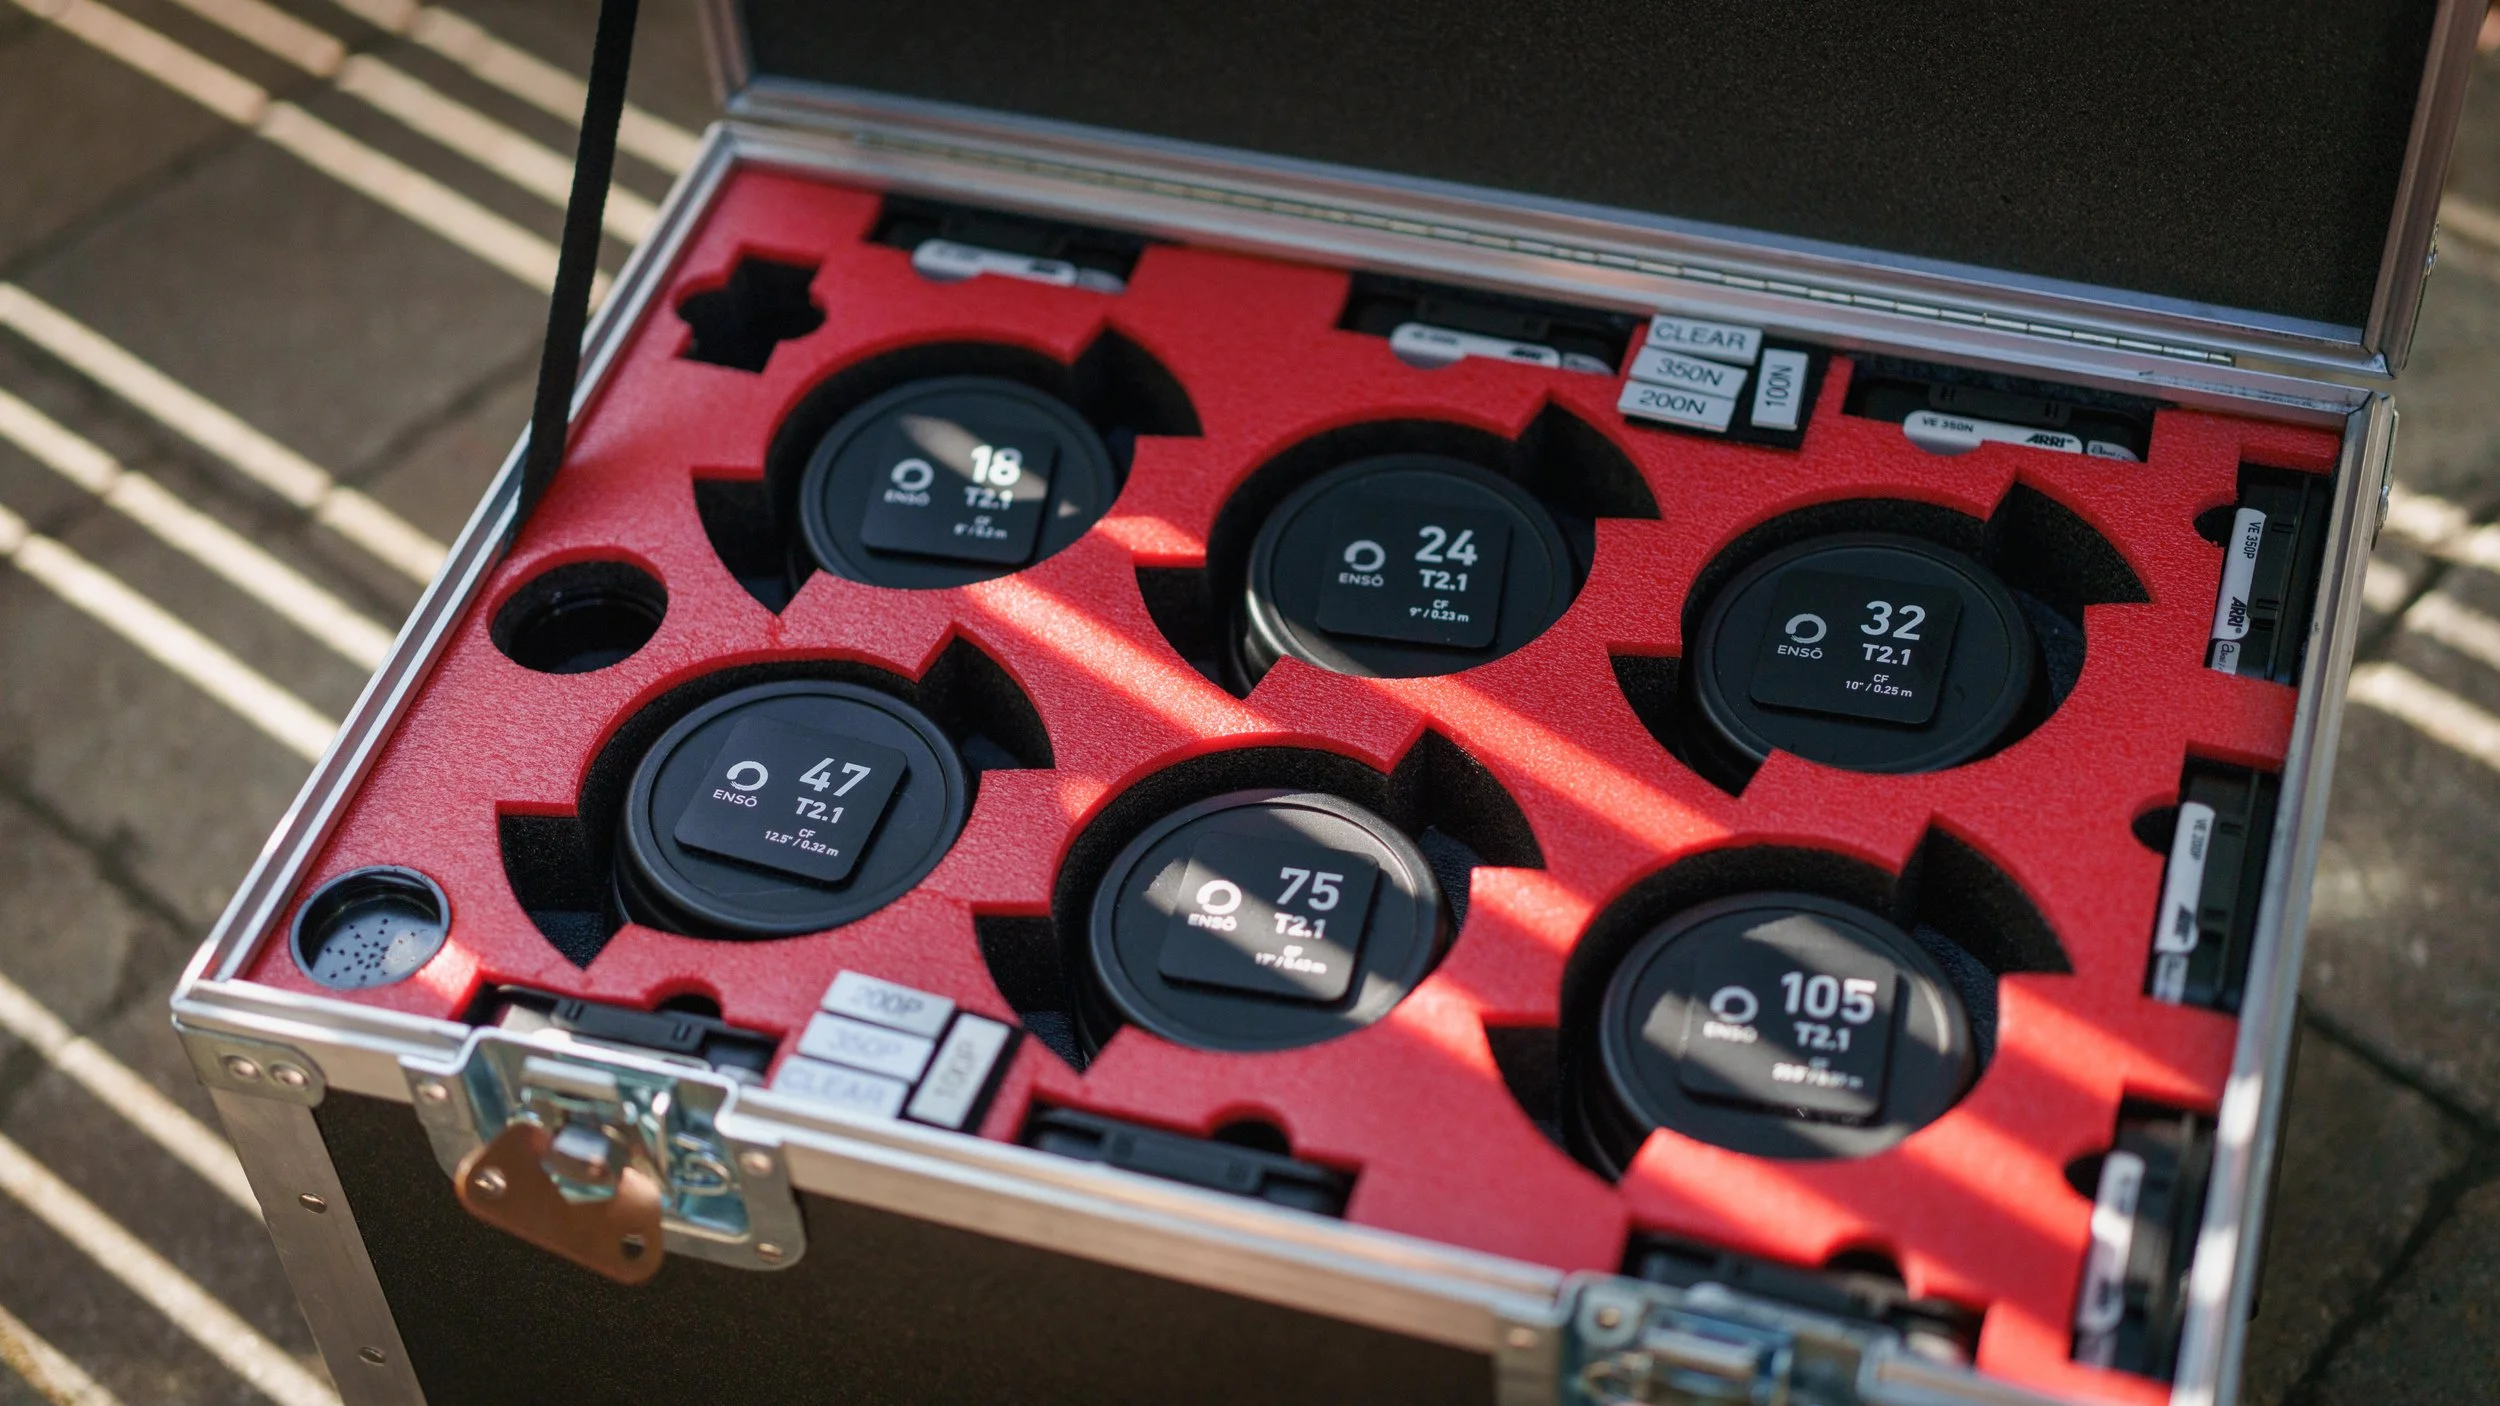
Rear Elements
This section should probably come later in this write up but this is the reason I decided to buy these lenses, why I fell in love with them and why you’re going to want to use them. The core set of lenses comes with 6 different strengths (100P, 200P, 350P and 100N, 200N, 350N) as well as customizable net holders and a “creative adapter”. I can shoot the lenses clean and get the gorgeous skin tones and fall off you’d expect from Arri lenses or add one of the rear elements and get a totally different look. On the Negative side a 350N gets something closer to a 25mm Canon Rangefinder but it’s easy enough to magnetically swap out the rear element to go in the other direction with a 200P and get closer to a CookeS4 look.
Henning Rädlein, the Producer of the Ensō launch film, says it best, “In essence they are diopters, but they behave differently and do a lot more than diopters that go in front of the lens. We have something similar but less sophisticated for the Signature Primes that we called Impression Filters, but for Ensō we call them Elements because they really are part of the optical chain.”
I’ve luckily have had the opportunity to shoot several drastically different projects within the first few weeks of receiving the set and change the look from project to project depending on the look and feel we are going for. The Positive (P) filters give something that is reminiscent of petzval lenses whereas the Negative (N) elements give you a more vintage look like you would see in lenses from the 60s/70s or rehoused still lenses.

What to Watch Out For
Options
It’s slightly daunting when you first get the lenses. With no modifications you have a gorgeous look the second you put the lenses on the camera but with each filter you have different characteristics as well as minor changes to the T-Stop and Field of View (more on that below). So 6 lenses and 6 rear filters becomes 36 combinations with the ability to add even more custom rear elements if you want.
When I first got them I intended to methodically test each lens, widest to longest going from clean to positive and then negative… but after a 6 month backorder I threw caution to the wind and started with the 18mm in OpenGate with a 350N filter (this is the most extreme look you can get) - “is this cinema?” - It was like looking at a movie. Gorgeous but probably too extreme for what I am shooting most of the time. The ease in changing the filters and the look I could get going from clean to P to N… I fell in love with the set right there. Personally for most projects I have leaned on the 200P as my starting place which took 2-ish hours of testing and I’ve only grown more confident in that decision as I’ve shot more with them.
Focal length vs Filter Strength vs Sensor Size
This pretty quickly became second nature but it’s maybe the most important thing you need to learn about the lenses. This is purely based on taste and keeping a consistent look across what you are shooting but there is a strong correlation between focal length, filter strength and sensor size. This is similar to how we use filters in a matte box if we were filming an interview with 2 cameras. We might start with an 1/8BPM for our ACam angle (35/50mm) but jump to a 1/4BPM for our BCam angle (85/135mm).
The way the filters are designed is you get the most extreme look at the edges of the image. So for example a 47mm with a 200P filter looks very different in S35 vs S35 OpenGate vs LF vs LF OpenGate. I really enjoy the look I get with this combination with the LF OpenGate sensor but it would probably be too much for an 18mm so I’d likely use a 100P filter. Again this is totally personal preference but it is something to be mindful of.

Changes in T-Stops and Field of View
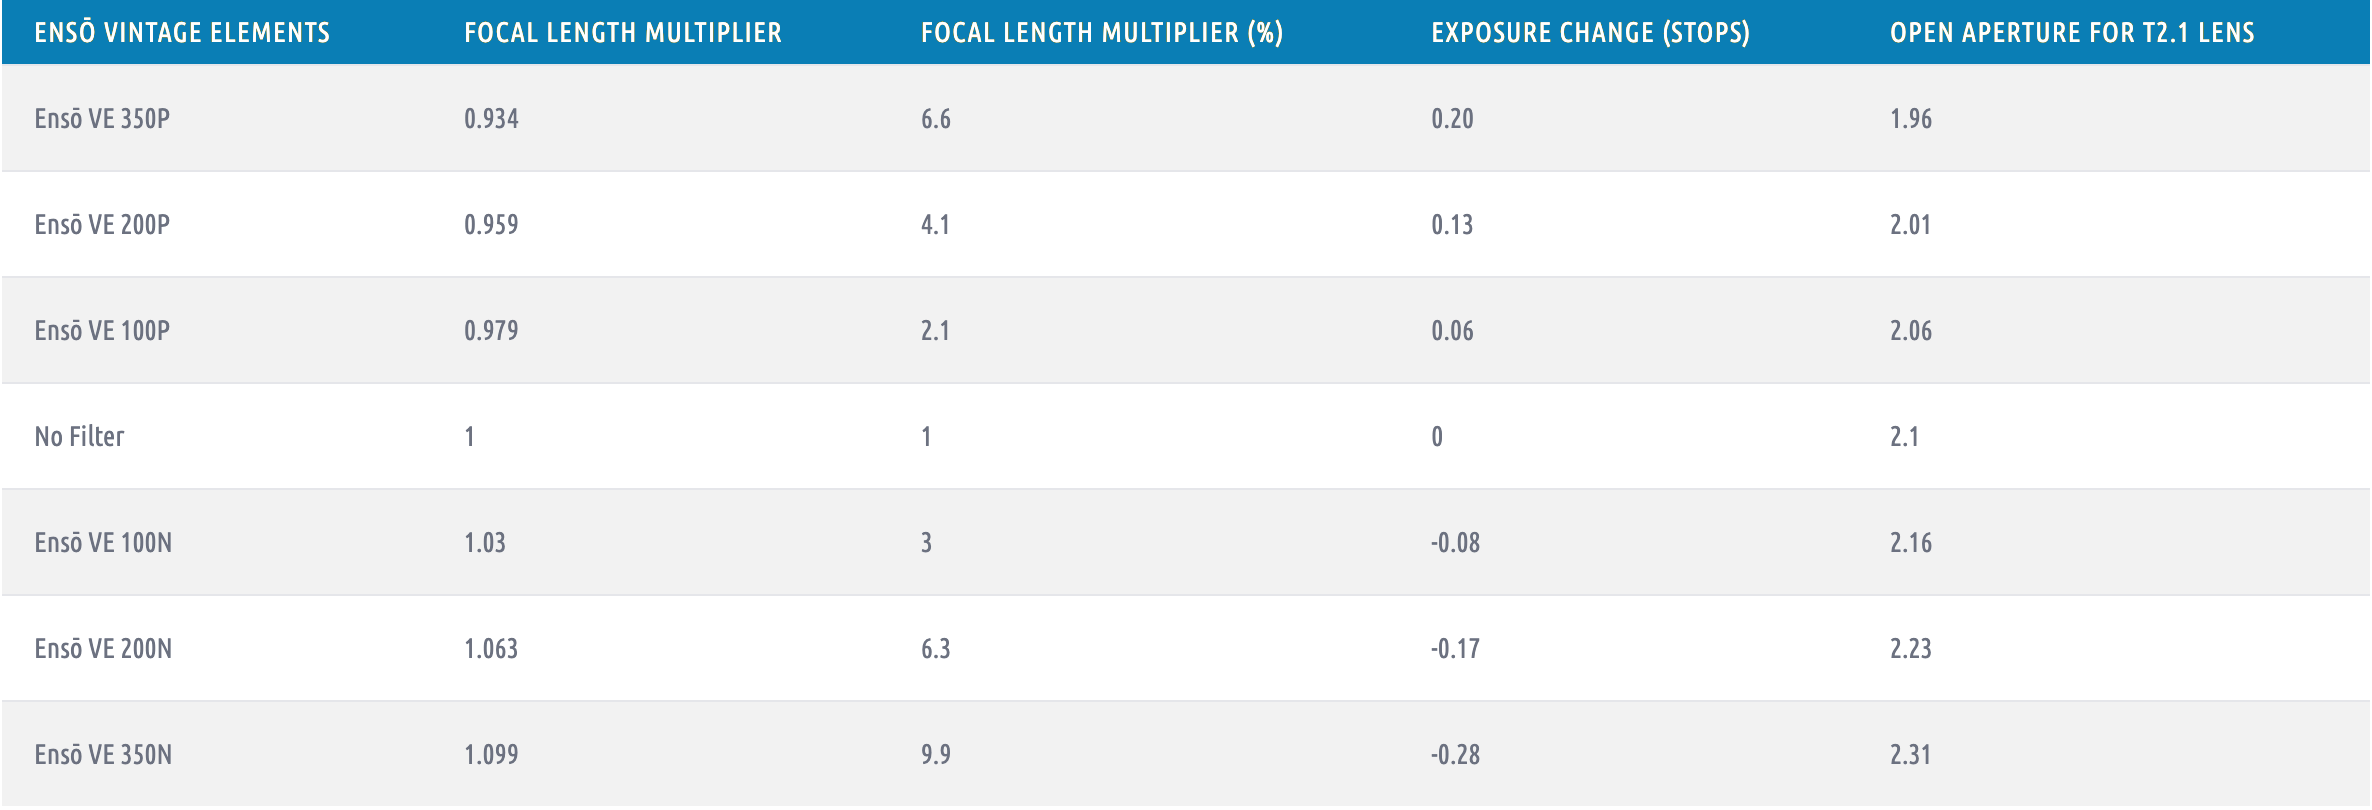
As we talked about, the rear elements basically act as negative and positive diopters. Think of a less extreme version of the Metabone Speedbooster a lot of us are familiar with. Depending on the strength of the filter and whether it is negative or positive you’ll be increasing or decreasing the amount of light and field of view.
I’ve added a chart below but for example a 24mm T2.1 with a 100P filter becomes a 23.2mm T2.0 lens. I haven’t found this to be a problem or even something I am consciously thinking about on set but it’s good to have in the back of your mind.

Focus Marks
I personally don’t use focus marks to pull focus and on larger jobs I have a 1st AC pulling focus for me so I haven’t run into this issue yet but it’s worth calling out. I am borrowing a bit of this information from Sean Dooley’s video “ARRI Tech Talk: Ensō Prime Lenses – Creative Flow” (link below).
If you are using the Positive filters wide open the focus marks will all line up with what is on the barrel of the lens BUT if you are using the Negative filters you need to add a shim to the lens 2mm for the focus marks to line up. But once you gradually stop down you’ll actually be moving the focus mark further away from what is actually being represented on the lens. The filters don’t prohibit you from focusing to infinity or anything like that but if you are relying on the marks on the barrel of the lens they can be off depending on how you are set up. The GOOD NEWS is that the Arri Hi-5 follow focus can be read via the LDS-2 & /i metadata from the filter you are using and dynamically compensate for that filter. This metadata is also captured by the camera for post production and can be streamed for any live VFX work happening onset.
In addition to Sean’s great explanation via the YouTube video he was reminded by “Arri Optical Engineers” that if you want the true lens characteristics as defined by them you need to shim the lens 2mm when using the Negative filters but it’s not something you have to do and it will only make the look of the Negative filters look more extreme.
Final Thoughts
I would really like to thank all the great reviews online as well as the most comprehensive reviews I’ve seen of the lenses from News Shooter (https://www.newsshooter.com/2024/10/15/arri-enso-first-look/) and FDTimes (https://www.fdtimes.com/pdfs/articles/ARRI/128-FDTimes-ARRI-Enso-Report.pdf).
And if you don’t like to read Art Adams from Arri has a high-level overview (https://www.youtube.com/watch?v=O0LPBsUe_NU) and Sean Dooley dives a bit deeper (https://youtu.be/trVTL9LIBE4?si=cYPOFSCfCZeKFjwh).
I am hoping to add additional lenses over time. The full line up is actually a family of 14 lenses ranging from 10.5mm to 250mm (even the 250mm keeps a 1:4 magnification). In addition they have 1.4x and 2x extenders. At the extreme ends of the line up some fronts change (notably the 10.5mm, 14mm and 250mm).
Highly suggest checking out the Arri site for more information about the Ensō’s (https://www.arri.com/en/cine-lenses/enso-prime-lenses/enso-lenses-technical-data) as well as the technical paper (https://www.arri.com/resource/blob/389646/5797289cce139989ffd094dcf0c1d545/ens%C5%8D-prime-lenses-user-manual-data.pdf).